sexta-feira, 31 de agosto de 2018

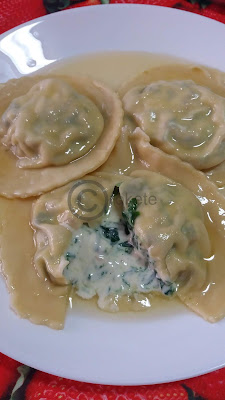
Butternut Ravioli

Answer to Diane on my Domed Jhudora Petit Four post:
- Thank you so much for your comment! I still think I could have done better but as it looks very complicated already, I tried a simpler process :)

~~~~~~~~~~~~~~~~~~~~~~~~~~~~~~~~~~~~~~~~~~~~~~~~~~~~~~~~

Hello!
Today my food of choice was the plate of Butternut Ravioli!
This will make a very good and nutritious meal and, regarding the original picture, it really goes very well with some sort of tomato sauce ;) If you eat the whole raviolis though, I have to warn you that it might get a bit cloying.
For these raviolis you will need (this gives about 6 or 7 big raviolis):
- a square cookie cutter with about 7cm x 7cm (mine had a ruffle like pattern on the sides just for the sake of imitation :P)
- Home made pasta dough (and follow the directions because it is a recipe for raviolis too, the only thing that changes is the filling and shape)
- 6 Tbsp of ricotta or mascarpone cheese
- 3/4 of a cup of grated parmesian cheese 
- 3/4 of a cup of butternut squash cut in small cubes
- 1 small egg
- salt and pepper to taste
- some semolina or cornmeal
Start by making the filling. In a small frying pan with a bit of oil cook the cubes of butternut squash for a few minutes, on medium-low heat, until tender. Scoop them out on a kitchen paper to remove the excess oil and set aside to cool completely.
After the butternut completely cooled mash it lightly with a fork and then combine the cheeses, butternut squash and egg in a bowl. Mix it well and season with salt (remember that parmesian is already salty) and pepper. Cover with plastic wrap and let it rest in the fridge.
Now make the pasta dough and roll it out just like the recipe in the link above. After that all done, place a tablespoon of filling for each ravioli and proceed until you have your raviolis covered with the second sheet of dough. Now use the cookie cutter to cut each ravioli and place them in a surface sprinkled with some semolina or cornmeal.
Make the raviolis until you run out of filling.
To cook them is pretty simple. A pot of water and a pinch of salt on high heat. Bring it to a boil and place the raviolis carefully in the water (you might have to do this in batches depending on the size of the pot). They'll be done 3 to 5 minutes after starting to float. Scoop them out with a slotted spoon and on a plate and lets prepare the tomato sauce! 

- 5 Tbsp of Tomate Frito (or you can use tomato puree with onion and garlic to taste: frying pan with a bit of olive oil on medium-low heat, all ingredients inside and let it boil for about 5 minutes, stirring it once in a while - tomate frito done!)
- salt, pepper and sugar to taste

- Some basil leaves to garnish

Now, all you have to do is heat the Tomate Frito in a small sauce pan or even in the microwave (I find it to be better on the stove), season it with salt and pepper, add a bit of sugar to cut the acidity of the tomato and voilà!
Pour it over the raviolis, garnish with the basil leaves and you're good to go! Enjoy!

*This image was taken from and belongs to Neopets.


segunda-feira, 27 de agosto de 2018

Omelette Monday - Cheese and Onion Omelette

Hello!
Today, and this might sound weird, I'm starting another new segment here on the blog! It is called "Omelette Mondays" and I don't think it needs any more presentations :P
On to the omelette I chose for today - Cheese and Onion Omelette! Super delicious, super easy to make, you probably already have the ingredients on hand at home... lets get started!
You will need for one pretty decent omelette:
- frying pan
- 2 eggs + a splash of milk
- a handful of crispy onion (or half a small onion chopped the way you prefer) + a few pieces of fresh onion for garnish
- cheese of choice, as long as it melts, and try not to use more that half a cup :P
- a bit of oil to fry and salt to taste (don't forget that usually the cheese is already salty)
Start by, in the same frying pan you'll be using, putting in a bit of oil, medium low heat and cook the pieces of onion for garnish until they become very tender. Scoop them to a plate and set aside.
Break the eggs into a bowl and season with a bit of salt, add a splash of milk and beat it all together. Put the frying pan with a bit of oil in medium heat and put the egg mixture inside. When it starts to coagulate the eggs, add in the cheese of choice (which can be sliced, shredded, grated, in cubes... your choice!) but save some for topping, and the crispy onion, but try to keep it all on one half of the omelette. It makes it easier to fold it.
When the top of the omelette is also coagulating, fold the omelette with the help of a spatula, and you can do this once, just folding it in two, or you can do it like I did and fold it in three (I usually do it like this 'cause it makes it slimmer so I can fit it in a better lunchbox for my boyfriend to take to work :P).
After folding the omelette, sprinkle the top with the remaining cheese, cover with a lid until the cheese melts. Turn of the heat, put on a plate and garnish with the cooked pieces of onion. Enjoy!

Notes:
- If you like your onion raw, that's fine and you can totally use it that way but I prefer it cooked and that's what I did;
- If you are using a fresh onion instead of crispy onion, you can use it raw or cooked, like the pieces for garnish;
- I used crispy onion because I have a big bag of it and it is almost expiring;
- I used Cheddar cheese and a Portuguese traditional kind of cheese for the inside of the omelette but I used a slice of Flamengo cheese (our equal to the generic American cheese) for the top;
- I didn't taste this omelette as it was made for my boyfriend's lunch at work, but I had a very positive feedback from him and, to be honest, I do trust my omelettes :P

*This image was taken from and belongs to Neopets.


sexta-feira, 24 de agosto de 2018

Fail Friday - Garlic Butter Hot Dog

Hello and welcome to a new series on this blog!
Kitchen and cooking involve science. Most of the times an exact science, some other times... not so much.
Cooking things we know can already be quite troublesome, let alone cooking made up foods from a world that doesn't necessarily exist (it will always exist in our hearts and souls! <3)!
And this is where Fail Fridays enter! :P
It will be a series where I will post the Neopian foods that don't go exactly the way I intended to and end up not really looking like the original. But it can be a fail for other reasons besides my ideal and the looks: it can be a fail in taste, in concept... you name it!
And to finish presenting this new series, I just have to say that this will not be up every Friday, it will be when I have a fail to show, and I will not fail neither on purpose nor every Friday (at least I hope so!).
Introduction made, let me show you my first fail. It is the Garlic Butter Hot Dog.
Why was this a fail? Because it didn't look anything like the original and it was one of those times I really didn't want it to, otherwise I would be throwing away food. So I made it edible, and it was quite delicious (and messy to eat), but I didn't adventure myself on making it as required. Here is the description of this Hot Dog - "Ten times fattier than regular hot dogs."
We already have an idea of the calories a regular hot dog can have so I tried to keep it on the same level. Here is the recipe if you still want to try it (it doesn't look like the original but at least it is edible without ten times the guilt:
- 1 hot dog bun
- 1 hot dog sausage
- 3 teaspoons of butter (I used butter flavored margarine)
- 1 clove of garlic
- mustard to taste
Start by heating the sausage in a pan with water. While that is happening melt the butter in the microwave. Those two things happening give you just the time to grab a plate, cut open the hot dog bun and prick its top with a fork ;)
When the butter is melted, drizzle a bit on the inside of the bun and on top of it, slowly so the bun has time to absorb the melted butter.
When the sausage is hot place it inside the bun and put on some mustard :)
Finish this off by grating the garlic on top of the bun, it will stick to the butter. Enjoy!

Now just a few notes for the interested: 
- I know there is garlic butter but I didn't understand this food like that, I understood it as garlic + butter on a hot dog;
- curiously the bun on the original picture looks more like a hamburger bun but I happened to have hot dog buns so why not keep it faithful?
- there is a lot of yellow stuff coming out from the sides of this hot dog on the original picture, I couldn't figure it in any way to be all butter, but even if it is, I couldn't bring myself to commit such an atrocity to my body so I used some mustard instead - still not in enough quantity to resemble the original picture;
- have in mind that the garlic will be all over your body throughout the whole day (stomach, lungs, esophagus, breath....), just working it all up!
- and basically this is why I consider this a fail: the concept is simply not ok (which makes the original picture not ok too!) :P at least not if you have a bit of respect towards your blood levels.

 *This image was taken from and belongs to Neopets.


quarta-feira, 22 de agosto de 2018

Blue Berry Pie

Hello!
Let me serve you something sweet and somewhat healthy :)
I'll be sharing with you Neopian Blue Berry Pie!
Blueberries are very expensive where I live so I opted for 2 individual pies instead of a big one.
For these two individual size pies you will need:
- 2 individual size pie dishes + two circles of parchment paper for the bottom
- 250 gr. of blueberries washed and very well drained (about one cup, maybe a little more)
- 1 store bought ready rolled shortcrust pastry
- 1 Tbsp of flour
- sugar, flour and powdered sugar as needed... oh, and save 6 blueberries for garnish :P

1 - Start by greasing the pie dishes with a bit of butter and line the bottom with the parchment paper. Set aside.
2 - Roll out the pastry and cut two circles of dough to fit in the pie dishes, so the circles have to be bigger than the pie dishes so they cover bottom and sides of the dishes. Cover the dishes with the pastry, carefully guiding the dough in instead of stretching it. Pierce the bottoms with a fork and set aside. Save the leftover pastry for later.
3 - In a bowl put the blueberries, flour and sugar and mix it all together so the blueberries are coated evenly with the flour and sugar. Try not to squish the berries. A note here: taste your blueberries before adding the sugar! Mine weren't that sweet but they weren't tart either so I only used 2 Tbsp of sugar.
Now divide the blueberries equally into each pie dish and arrange them so they are not piling up on the center. Set aside.
4 - Preheat your oven to 175º. C.
5 - Grab the pastry leftovers and sprinkle a surface with flour. Roll the pastry out again to the thickness it had before and cut 12 strips with about 1 cm. wide and long enough to go from one side of the pie dish to the other. Form a crisscross pattern on top of each pie, using 6 strips on each one and pinch the ends together with the sides as good as you can so they don't shrink back while baking.
6 - Put the pies in the oven and let them cook for about 30 minutes or until the crust is fully cooked though.
Dust with some powdered sugar and garnish with three blueberries in the center of each.
I know the crisscross I made is not exactly the same as the original in the picture but... I got my mind completely confused about it and ended up doing it the easiest way ;) Still, enjoy!

 *This image was taken from and belongs to Neopets.


sábado, 18 de agosto de 2018

Exotic Fried Noodles

Hello!
Today I'm going to share with you my recipe on Exotic Fried Noodles.
This one is quite simple too. Just your regular noodles fried up after boiled, with some other elements joining the party ;)
You will need, for one very hungry person or two decent people :P :
- 250 gr. of home made noodles or 300 of store bought noodles
- 5 crab sticks (imitation crab meat) cut into cubes
- 6 or 7 broccoli florets
- 3 or 4 onion rings (I used a slice of leak because I didn't have onions)
- 1/4 cup of diced mango (you can substitute it by pineapple)
- water as needed
- a drizzle of sesame oil (or any other oil but sesame gives it that peculiar taste)
- a big pinch of Chinese 5 Spice
- salt, pepper and chili flakes to taste
- Frying pan

1 - Lets start by boiling the onion rings and broccoli florets for about 2 minutes in the frying pan with some water and a pinch of salt (let the water boil, add the veggies and count 2 minutes). When that's done, use a slotted spoon to scoop out these guys to a plate and set aside (you can use the same plate where you'll be eating this from... it helps with the dish cleaning :P).
2 - To the same water, add the noodles and add more water, if needed, to cover the noodles. These will take about 5 minutes to be cooked, but have a bite just to make sure (carefully because it will be very hot!). Scoop out the noodles to a plate (which can still be the previously used :P) and drain the water from the frying pan.
3 - Add a drizzle of sesame oil to the frying pan, let it heat a bit on medium-low heat, and add in the broccoli, onion rings, diced mango and crab stick cubes. Give it a stir, they don't need to get brown, and add in the noodles. Season with the Chinese 5 Spice, salt, pepper and chili flakes according to your taste (don't forget to taste everything before seasoning, sometimes it doesn't need any more salt) and keep stirring the noodles quickly so they don't stick to the bottom of the pan, and let them achieve a golden brown color. Turn of the heat and serve.
To make it similar to the original Neopets image, try to keep the broccoli florets and the onion rings on top of the noodles, as if garnishment. Enjoy!

 *This image was taken from and belongs to Neopets.


terça-feira, 14 de agosto de 2018

Domed Jhudora Petit Four

Hello!
Today lets try a sweet!
We just need to be a bit careful because it's... Domed Jhudora Petit Four!
Nah, I'm only joking ;) But let me share how I did this. You can make as many as you want, curiously I've only made one because this time I cheated, as I didn't make practically anything from scratch, and this way is much easier (p.s.: and I still haven't mastered the covered Petit Fours). You will need:
- 2 almost perfect square pieces of a firm cake (with about 4cm x 4cm and 1cm thick (or depending on the size of the marshmallow) - and pound cake is fine)
- a sweet and firm spread of your choice (I used Nutella)
- a domed marshmallow (with about the size of half a ping-pong ball)
- 100 gr. of white sugar paste
- water as needed
- green, yellow, purple and pink food colorings
- small and clean syringe
- a tray and a wire rack

1 - Lets start by making a sandwich with the cake pieces and the spread. Spread the filling and arrange it in a way that nothing comes out of the sides. It has to be an almost perfect sandwich ;) put it on a plate and set it aside.
2 - Put the sugar paste in a microwavable bowl and heat it for about 7 seconds. Test it for consistency. It has to be soft to the touch. If you touch it normally with a finger it must sink reasonably. So if this does not happen after the first 7 seconds, keep heating it 5 seconds each time until you get there.
When you get it right, add in a teaspoon of water and mix very well. You are looking for a very gooey and considerably thick mixture, that you can drizzle over the petit four without being too runny. Keep adding water if needed until you reach this gooey consistency.
3 - After that, take a little of the mixture to a separate bowl so you can dye it purple for the purple swirl on top of the petit four.
4 - Now lets play with the colors! To the larger amount of sugar paste add in a drop of green coloring and mix well. You are looking for that bright Jhudora's green! So you need to add a bit of yellow too. Keep adding coloring little by little as needed until you get that bright green!
Do the same for the small amount of sugar paste but using the purple and pink food coloring. Add a little of purple first and if needed add a bit of pink. You have to achieve that peculiar Jhudora's purple too ;) Just remember to mix very well so the colors blend in uniformly.
5 - Lets assemble the little guy.
Place the petit four on the wire rack with the tray underneath it and spread a bit of the green paste on top. This will help the domed marshmallow to stick on top of it. After sticking the marshmallow on top of the petit-four, drizzle the green mixture of sugar paste all over it! You may find it helpful to use a butter knife to cover all the sides and little spaces of the petit four. Let it sit like that for a bit so it drains the excess sugar paste and dries a little (this will never dry completely).
After about 20 or 30 minutes, use the syringe to apply the purple sugar paste swirl on the domed part of the petit four.
And there you have it! This is a treat for the very sweet tooth only! Enjoy! ;)

*This image was taken from and belongs to Neopets.


sexta-feira, 10 de agosto de 2018

Cheeseburger and Ultimate Burger

Hello!
Let's lay back a bit from complicated recipes but enjoy something equally delicious! Today I have another 2 in 1 recipe... well... actually it's just because you can make one out of the other :P Here are Cheeseburger and The Ultimate Burger.
If you make both (which I did, the smaller for me and the bigger for my boyfriend) you will need:
- 2 burger buns + 1 bottom slice
- 3 burgers (I used mixed meats burgers)
- 5 lettuce leaves
- 6 slices of tomato
- 5 slices of cheese
- sauces of your choice - I used mayo, ketchup and burger sauce
- oil, salt and pepper as needed

Start by heating a frying pan on medium heat with a bit of oil. When the pan is hot, reduce to low and put in the burgers. Season with salt and pepper to taste and let them cook a few minutes on each side. How to know they're ready? When you stick a fork or a skewer in the middle of it and the juices coming out are clear, they're done! But this really is a matter of taste ;) anyway, burgers done, lets assemble our meals!
For the Cheeseburger:
Place the bottom of a bun on a plate and then stack it in this order: 2 slices of cheese, one leaf of lettuce, sauce, 2 slices of tomato, sauce, burger, another leaf of lettuce and finish it with another sauce and the "cap" of the bun! Here you have it, your Cheeseburger Neopets style ;)

*This image was taken from and belongs to Neopets.


Now, for the Ultimate Burger:
You do exactly the same thing as you did for the Cheeseburger but, in the end, you don't end it, you continue :) so instead of placing the "cap" of the bun to finish it, you put the +1 bottom slice of a bun and you repeat the stacking: 2 slices of cheese, one lettuce leaf, sauce, two slices of tomato, sauce, another burger, another lettuce leaf, more sauce and now, yes, you do finish it by topping it with its "cap"! This really makes a huge burger but, it is what they call it, Ultimate Burger.
I wouldn't be surprised if you had to deconstruct it to be able to eat it ;)
But, however you chose to eat it, just enjoy!

*This image was taken from and belongs to Neopets.

terça-feira, 7 de agosto de 2018

Ravioli with Altadorian Stuffing

Hello!
Today's recipe is a two-in-one. I present you Ravioli with Altadorian Stuffing.
This recipe involved quite some work but it turned out great!
Ok so this is two-in-one why? Because I will give you the recipe for the pasta dough too.
For this recipe you will need the following things:
For the pasta dough (you probably won't use it all):
- a food processor
- 1 and 1/4 cups of flour
- 1 large egg beaten
- 1/2 tbsp of olive oil
- 1/2 tsp of salt
- 1/8 cup of water (more or less)

Put all the ingredients in the food processor except for the water and pulse them until they resemble large crumbs. Then, with the motor running, start adding the water, little by little, until it creates a slightly sticky dough. Take it out of the processor onto a surface dusted with flour and knead the dough to bring it all together. If you feel it's too stick, add a bit more flour, if too dry add a bit more water. Always little by little and kneading well between additions. Form a ball with it, place it in a bowl, cover with plastic wrap and let it rest in the fridge for about 30 minutes.
(You can absolutely make this dough by hand, it will take more time and effort but it is possible. With the leftovers you can make regular pasta, just cut long strips of it and you will have fetuccinne, for example).
Lets work on the stuffing.

For the stuffing (for about 6 or 7 big ravioli - 10 cm in diameter):
- 200 gr. of mascarpone or ricotta cheese at room temperature
- 2 cubes of frozen spinach leaves, thawed
- 1/4 cup of grated parmesan cheese
- 1 small egg
- a handful of walnuts, chopped
- salt and pepper to taste

Combine all the ingredients in a bowl and mix them all together to create a beautiful creme. Set aside.

Lets prepare to roll out the dough.
Dust a large tray or surface with some fine cornmeal. You will put your rolled pasta onto this surface.
Cut the dough in four equal pieces, flour your working surface with flour and roll each piece like a long sheet (with about 13cm x 30cm) with about 2 mm of thickness. Apply flour as needed.
Place each sheet of rolled pasta dough on the fine cornmeal as you go.
After all rolled out, lets make our raviolis!

Grab a little bowl with some water and a 10 cm diameter round cookie cutter. Get your stuffing and a teaspoon. Ready, set, go!
In a sheet of pasta dough place about two teaspoons of stuffing, creating little mounds, with some space between each. Wet you finger with a bit of water and circle each mound of stuffing with it, it will act like glue. Take another sheet of pasta dough and put it right on top of the one with the mounds of stuffing. Adjust the sheet tightly around each mound, making sure there is no air inside. Grab your cutter and, keeping the stuffing in the middle, cut the raviolis. Keep doing this process until you run out of pasta or stuffing. Any of the leftovers are usable. You can use the stuffing leftover in an omelette, for example.

Cooking the raviolis is easy. Put a pot of water on heat and bring it to a boil. Place the raviolis in, carefully, and when they start to float give them 3 or 4 more minutes and they are done. Take them out with a slotted spoon onto a plate and lets serve with that luxurious sauce.

For the sauce:
- the juice of one lemon
- 1 tbsp of honey

Just mix these two ingredients together until the honey dissolves completely into the lemon juice, and drizzle some of this sauce onto the cooked raviolis. Enjoy!

*This image was taken from and belongs to Neopets.


domingo, 5 de agosto de 2018

Spicy Chicken Burrito

Hello!
Today's recipe is great for a simple but nutritious meal: Spicy Chicken Burrito.
For two burritos you will need the following ingredients:
- 2 regular flour tortillas (about 18 or 20 cm in diameter)
- 1 chicken breast cut into small bite size pieces
- about 200 grs. of already cooked red kidney beans
- 4 slices of cheese
- salt, peper to taste
- a pinch of chilli powder/flakes
- 1 tsp of balsamic vinegar
- 1 tsp of tomato paste
- 1/2 tsp of sugar
- 1 tsp of oil to cook the meat + 1 tsp of oil to use with the beans
- water as needed

Start by putting the oil in a frying pan and put the chicken breast pieces in it. Season with salt and the chilli powder/flakes and cook it on low heat. You don't want the chicken to brown, just cooked. The meat will probably release some juices so, after it's cooked, turn off the heat and use a slotted spoon to remove the meat from the pan to a plate and set it aside. Now lets use those juices.
Put 2 or 3 tbsp of the beans in the pan with the juices and mash them with a fork. Add in the remaining oil, some salt and pepper, the balsamic vinegar, the sugar, the tomato paste and the rest of the beans and coarsely mash them with the fork. You don't want a complete puree, just enough so you can have a mixture that holds the beans together when rolling the burrito. If the juices are not enough to make it a relatively smooth mixture, add in some water, a tbsp at a time until you get the consistency right. If the juices are too much, take the mixture to high heat so some of the juices evaporate. Keep an eye on it, stirring constantly, it may happen quite fast and burn the beans!
Give the beans mixture a good stir to bring all the ingredients and seasons together and lets roll those burritos! (If you want your beans heated, just heat them a bit on the stove).
On a plate put the tortilla and some chicken on it, then some beans on top and finish it off with two slices of cheese. Roll the tortilla into a burrito and repeat with the other tortilla! Enjoy!

*This image was taken from and belongs to Neopets.


sábado, 4 de agosto de 2018

Potato and Sweetcorn Soup

Hello!
Today's recipe will be for a very heartwarming food: Potato and Sweetcorn Soup.
For this recipe, which will give you about 3 portions, you will need:
- a pot
- a hand blender
- 1 onion
- 3 large potatoes
- a small can of sweetcorn, drained
- a small clove of garlic
- salt to taste
- drizzle of olive oil

1- Peel and wash the onion, potatoes and garlic. Cut/dice them in small pieces and put them in the pot, season with a pinch of salt (start with a pinch, you can add more later if needed) and drizzle a bit of olive oil. Fill with water until all the vegetables are submerged and bring it to a boil on high heat. After that, reduce the heat to minimum and let it cook, partially covered (so it doesn't spill) for about half an hour.
2- After half an hour, turn off the heat and let it cool for a bit. In the meanwhile, put the sweetcorn in a tall jar and blend it all with the hand blender. The result will not be very smooth but that's ok.
3- After letting the soup cool a little, use the hand blender to reduce the vegetables to a thick creme. Taste for salt and add more if needed.
4- Mix about 2/3 of the pureed corn in the potato creme and use the remaining as garnish on each portion, after serving, giving it a little swirl around. Enjoy!

*This image was taken from and belongs to Neopets.


sexta-feira, 3 de agosto de 2018

Butterscotch Milkshake

Hello!
Today's recipe is really simple: Butterscotch Milkshake.
For one milkshake you will need:
- 2 tbsp of butterscotch sauce (recipe below if you need it)
- 200 ml. of cold milk

Put the milk in a glass, add the butterscotch sauce and mix it in very well until the sauce is completely dissolved in the milk. Enjoy!

Recipe for butterscotch sauce. You will need:
- a sauce pan
- a heat proof spatula
- a whisk
- 1 cup of sugar
- 6 tbsp of butter
- 1/2 cup of cream
- pinch of salt

In a sauce pan put the sugar and take it to the stove on medium heat and, with the spatula, keep stirring it until the sugar is completely dissolved and turns to a lovely amber color. Be careful not to let it burn so, if necessary, reduce the heat. Switch the spatula to the whisk. Whisk in the butter, a tbsp at a time, until it melts completely. Be careful 'cause it may splash a bit.
After the butter is melted, add in the cream, very slowly and carefully because this will bubble fiercely and it may splash again and burn you!
Keep whisking it for another minute, turn of the heat, add in the salt, whisk it in to melt and let it cool completely before transferring it to a jar (with a lid) or before using. It will thicken up a bit after cooled. Store in the fridge.

*This image was taken from and belongs to Neopets.

quinta-feira, 2 de agosto de 2018

Cloud Usul Iced Buns

Today I will be sharing with you my recipe for Cloud Usul Iced Buns.
For this recipe you will need the following material and ingredients:
For the buns (this recipe makes about 7 buns):
- A steaming utensil to fit in a pan/pot;
- 7 pieces of parchment paper cut into about 5cm x 5cm
- 3.5 gr. of instant dry yeast
- 1 tbsp of sugar
- 1/2 tbsp of vegetable oil
- 1/2 cup of lukewarm water
- 1 and 1/2 cups of flour
- pinch of salt
- 1/4 tsp of baking powder

In a bowl put the lukewarm water, the sugar, the yeast and the oil and let it activate for 10 minutes.
After 10 minutes add in the flour, the baking powder and the salt and mix it well. If the dough is too dry add more water, if too wet add more flour. Little by little. Keep kneading it for 8 to 10 minutes until you get a very smooth and only very lightly tacky dough. Shape it into a ball and place it in an oiled bowl. Also oil the surface of the dough ball (so it doesn't form a dry crust) cover the bowl with a kitchen cloth or plastic wrap and let it rise for 2 hours.
After two hours put the dough in a floured working surface, and shape it into a roll. Cut the roll in 7 equal pieces, shape them into small balls and place them in a floured tray or surface. Cover them with plastic wrap or cloth and let them rest again for 10 minutes.
In the meanwhile fill a pot with water and bring it to a boil. Reduce the heat to low and prepare the dough balls for steaming. Place as many parchment paper pieces in the steaming utensil as dough balls can fit (keep in mind that they will puff up a bit while cooking) and place each ball on each paper piece. Place the steaming utensil on the pot with the steaming water and put on a lid. Let them cook for about 7 minutes. After cooking, take them off the heat, substitute the lid for a kitchen cloth and let them rest a minute, covered with the cloth, before taking them out of the steaming utensil. Let the buns cool completely before icing.

For the blue-ish icing:
- a wire rack
- 2 cups of powdered/icing/confectioner sugar
- a bit of pasteurized egg whites
- blue, purple and pink food coloring

In a bowl put in the sugar and add the pasteurized egg whites, little by little, mixing all the way, until you get a very thick consistency (spreadable like Nutella). Now, with the help of a toothpick, add the coloring (use a different toothpick for each color), also little by little (because you can always add more but you can not take back what's already in) and mix it all in until you get the desired color (in this case, a very light almost indigo like color). - Now it can get a bit messy ;)
After the buns have cooled completely, and with the help of a knife, peel off the shiny crusty layer of each bun and use a butter knife or a spatula to ice each one with the blue-ish icing mixture. Then place them on a wire rack with some parchment paper underneath so in case it drips you can always scoop it out and use it again. You don't need to ice the top of the buns since they will be topped with the white icing. Let the blue-ish icing set.

For the white icing:
- 2 tbsp of powdered/icing/confectioner sugar
- 2 very fresh egg whites
- an electric mixer
- a piping bag

In a bowl put the egg whites and start beating them with the electric mixer until it becomes frothy. Start adding the sugar, slowly, and keep beating until you get very stiff and glossy peaks. Put this icing in the piping bag (and you don't need to use a piping tip for this) and pipe a large and reasonably wide swirl of icing on top of each bun. Also apply a bit of this icing on the sides of each bun and, with the help of a butter knife or spatula, shape it into cloud like shapes.

For the "cherry" on top:
- either real cherries, or pink/red hard candy, or what I used, white fondant paste colored with a very tiny bit of red food coloring molded into small balls and with a very small cut on a side.

Place a topper of your choice: cherry or hard candy. But if you use molding fondant like I did, don't forget to brush a bit of clear jam or water on the small ball, just for the sake of the gloss ;)
Enjoy!

*This image was taken from and belongs to Neopets.


quarta-feira, 1 de agosto de 2018

Scrambled Egg Pie

This is the first Neopian recipe I'll be sharing with you, Neopets lovers!
This is the recipe for Scrambled Egg Pie.
You will need the following materials and ingredients for 1 person (or two if you like to share):
- An individual size pie dish (or any type of individual heat proof dish) and some weights (like dried beans);
- 1 ready made shortcrust pastry;
- 2 medium (or 3 small) eggs;
- 3 tablespoons (tbsp) of milk;
- pinch of salt
- 1 teaspoon (tsp) of chopped chives
- 2 or 3 basil leaves (one for garnish, the rest chopped)
- 1 tsp of oil

1 - Pre-heat your oven to 175º C., and start off by preparing the crust.
Butter or oil the pie dish. Cut the pastry in order to fit in the pie dish leaving a small edge (make sure you have enough crust for the base and to cover the pie) and pierce the bottom with a fork. Line it with aluminum foil, carefully to not pierce the dough any more, and place the weights on it. Take it to the oven for about 10 minutes.
2 - In the meanwhile crack the eggs into a bowl, add the milk, season with salt and give it a little whisk with a fork. Heat the oil in a frying pan and scramble the eggs to taste. After cooking the eggs, turn off the heat and set them aside.
3- After 10 minutes, take the crust out of the oven, take off the weights from it, and put it in the oven again to bake for 5 to 7 more minutes.
4 - After baking, take the crust out of the oven, put the eggs in the crust (save a little bit for garnishing), sprinkle with the chopped chives and basil and cover with a circle of the remaining pastry, making sure to tuck it in between the baked crust and the eggs (be careful not to burn yourself!). Brush it with a bit of milk, sprinkle with some Chinese Five Spice and, with a knife, cut a little X shape in the middle of the pastry (for the steam to come out). Place it in the oven again to cook the top of the pie (if you have a grill option in your oven, that would be the one to use, if not, reduce the heat to 150º C. and place the pie on the top shelf of the oven.
5 - The pie will be done when the top crust is golden brown.
6 - Garnish with the piece of scrambled egg and the basil leaf and enjoy!

*This image was taken from and belongs to Neopets.